Step 2 of 2

NeuroHand 1.0 · legacy Maker Edition guide

Connect the original HAND on Windows.

These instructions are for the first-generation NeuroMaker HAND with the blue power board, replaceable batteries, and separate UNO programming controller—not HAND 2.0.

Before you start

Have these six things ready.

Step 1

Install and open mLink 2 for Windows

Open the official mLink2…exe file you downloaded, complete the installer, and leave mLink 2 open. If Windows asks whether the installer may make changes, confirm only after checking that it came from Makeblock.
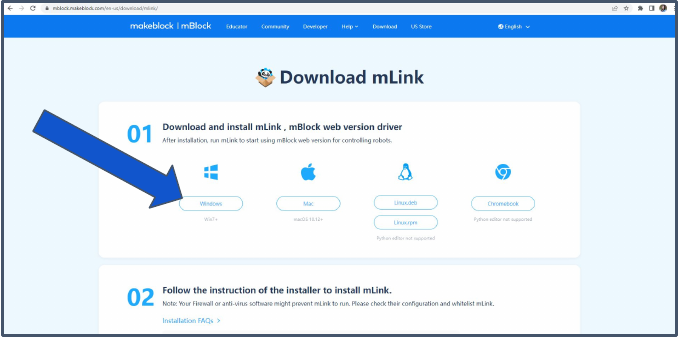
May 2022 NeuroMaker reference showing the Windows mLink download and installation flow
Official NeuroMaker HAND mBlock setup reference, May 2022. The current interface may look different.

Step 3

Prepare the original HAND hardware

Turn the HAND off. Install one fresh 9V alkaline battery and four fresh AA alkaline batteries; do not use rechargeable batteries. Check the controller on the blue power board: use the removable microcontroller marked UNO, not the factory controller marked BrainDEMO. If BrainDEMO is installed, power off before carefully swapping it for UNO. Connect a data-capable USB cable to the UNO programming board, then turn the HAND on.
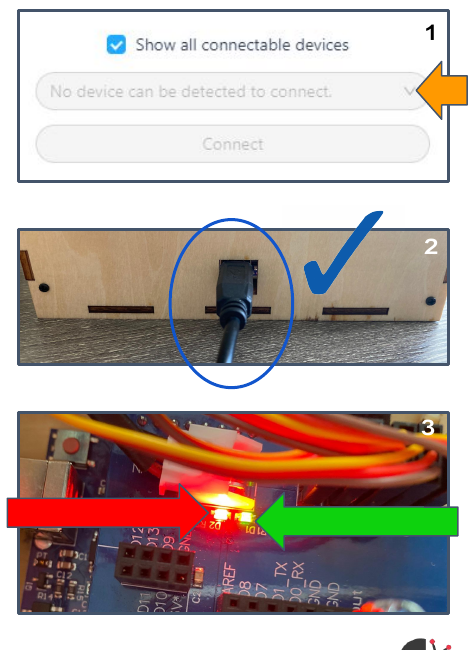
May 2022 NeuroMaker hardware troubleshooting reference showing the USB connection and red and green power-board lights
Official NeuroMaker HAND mBlock setup reference, May 2022. The current interface may look different.

Step 4

Open the mBlock web editor

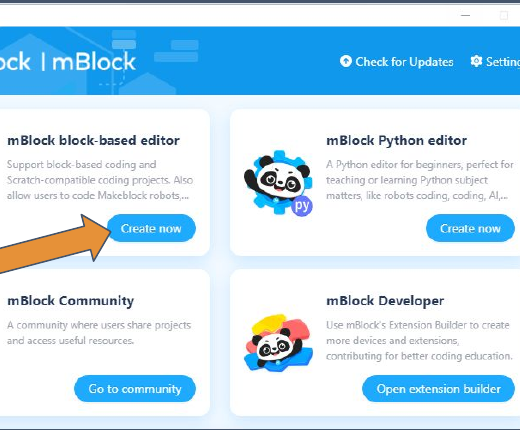
In the newly restarted Chrome window, go directly to ide.mblock.cc. Choose the block-based web editor if Chrome or mLink offers more than one destination.
May 2022 NeuroMaker reference showing mLink and the ide.mblock.cc web-editor address
Official NeuroMaker HAND mBlock setup reference, May 2022. The current interface may look different.

Step 5

Close the default Panda sprite

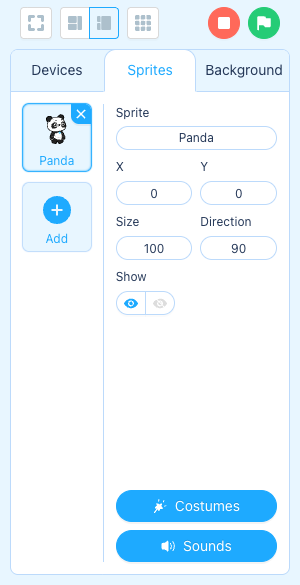
Open the Sprites tab near the lower-left corner. On the Panda card, click the small blue × to remove the default sprite, then return to Devices.
Current mBlock Sprites panel showing the blue X on the default Panda card
Current Makeblock reference screen. Device tiles are illustrative; keep Arduino Uno selected.

Step 6

Add the current Arduino Uno device

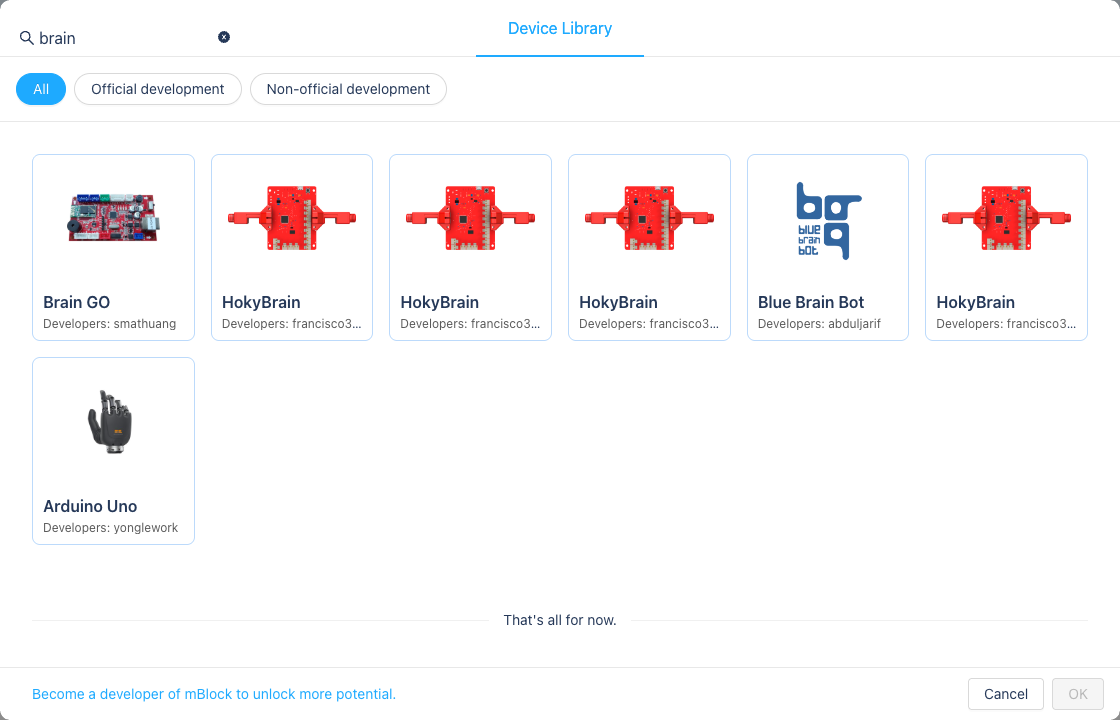
Under Devices, click Add. Search for brain, choose Arduino Uno by developer yonglework, and click OK. In the current editor this package can load the HAND block categories automatically.
Current mBlock Device Library search for brain showing Arduino Uno by developer yonglework
Current Makeblock reference screen. Device tiles are illustrative; keep Arduino Uno selected.

Step 7

If needed, add the legacy Arduino Uno device

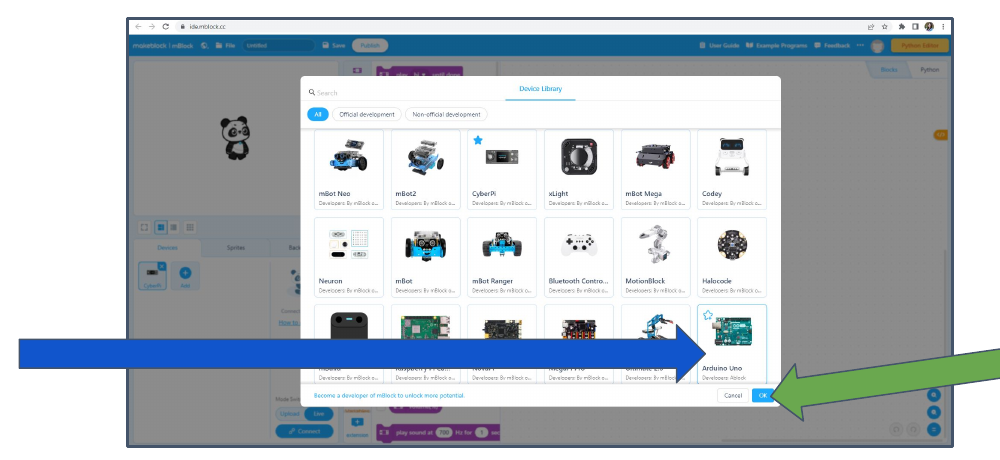
If the HAND block categories did not load, reopen the Device Library and select the standard Arduino Uno board tile—the reference screen shows the blue Arduino board and developer Ablock—then click OK. This begins NeuroMaker’s official first-generation fallback sequence.
May 2022 NeuroMaker reference identifying the standard Arduino Uno board tile in the mBlock Device Library
Official NeuroMaker HAND mBlock setup reference, May 2022. The current interface may look different.

Step 8

Open the lower Extension library if needed

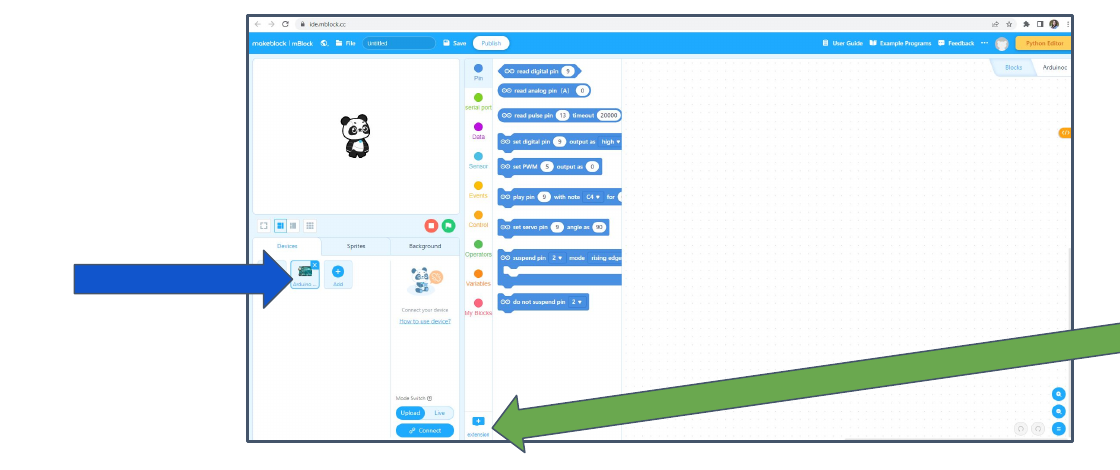
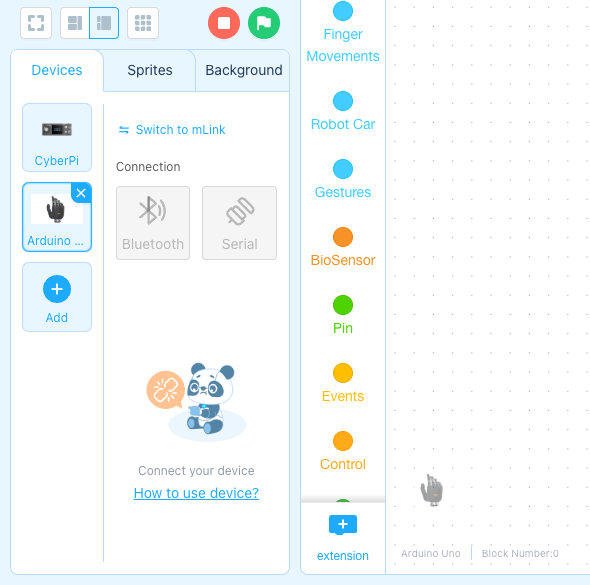
For the legacy fallback, confirm Arduino Uno now appears in the Devices list. Near the bottom of the block-category column, click the lower extension + button. This is separate from the Devices Add button.
May 2022 NeuroMaker reference pointing to Arduino Uno in Devices and the lower extension button
Official NeuroMaker HAND mBlock setup reference, May 2022. The current interface may look different.

Step 9

Search for NeuroMaker exactly

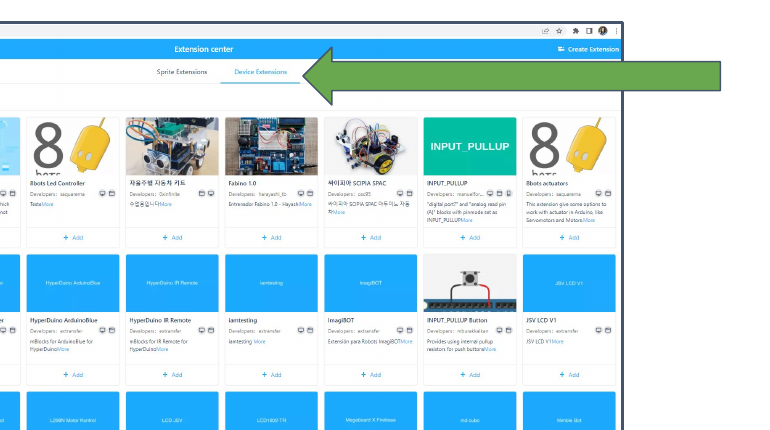
In the legacy Device Extensions fallback, enter NeuroMaker with the capital N and M. The legacy search is case-sensitive, so spelling and capitalization matter.
May 2022 NeuroMaker reference showing the Device Extensions tab and case-sensitive NeuroMaker search
Official NeuroMaker HAND mBlock setup reference, May 2022. The current interface may look different.

Step 10

Add the legacy NeuroMaker Hand extension

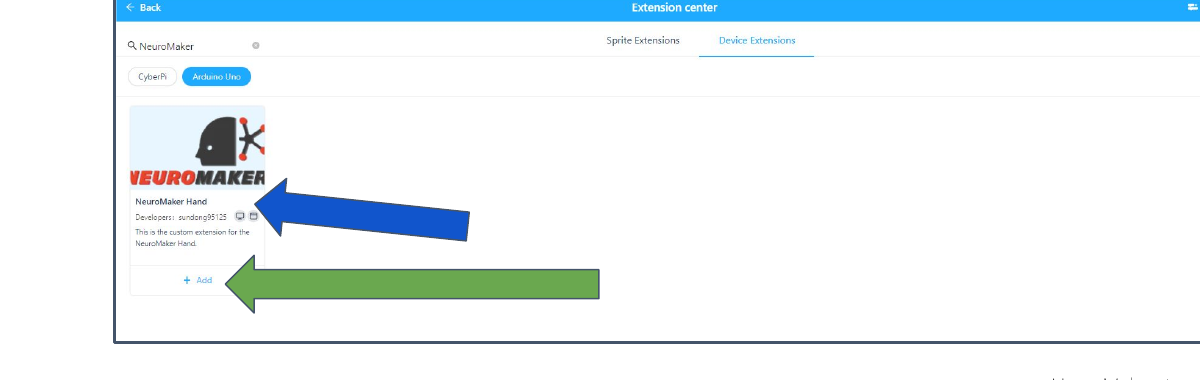
Locate NeuroMaker Hand in the legacy results and click + Add. Keep the standard Arduino Uno device selected while adding the original HAND-specific coding blocks.
May 2022 NeuroMaker reference showing the NeuroMaker Hand extension and Add control
Official NeuroMaker HAND mBlock setup reference, May 2022. The current interface may look different.

Step 11

Confirm the HAND blocks and starter block

After either the current device package or the legacy extension path, HAND categories should appear, including finger-movement blocks. The workspace must include the yellow When the hand is ready starter block. Every uploaded HAND program needs that block or it will not compile correctly.
Current mBlock editor with Arduino Uno selected and HAND block categories visible
Current Makeblock reference screen. Device tiles are illustrative; keep Arduino Uno selected.

Step 12

Switch the editor to mLink

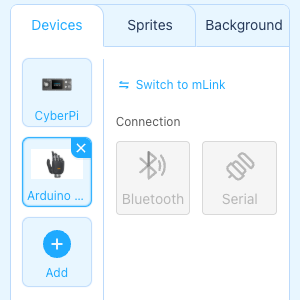
In the device panel, click the exact link Switch to mLink. Leave mLink 2 open in the background. After the switch succeeds, the link may change to Switch to direct connection.
Current Makeblock reference highlighting the Switch to mLink link
Current Makeblock reference screen. Device tiles are illustrative; keep Arduino Uno selected.

Step 13

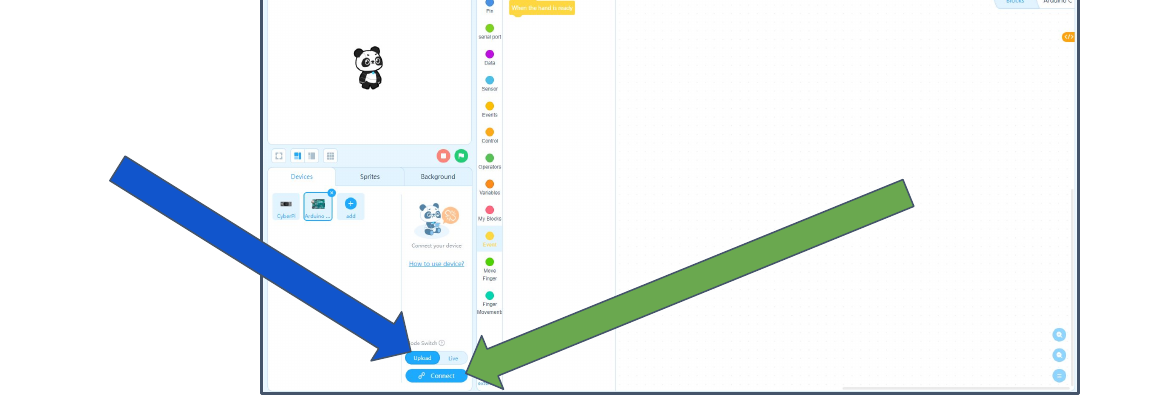
Choose Upload, then Connect

Set the mode at the lower left to Upload, not Live. Then click Connect. Upload mode stores the program on the original HAND’s UNO controller.
May 2022 NeuroMaker reference pointing to Upload mode and the Connect button
Official NeuroMaker HAND mBlock setup reference, May 2022. The current interface may look different.

Step 14

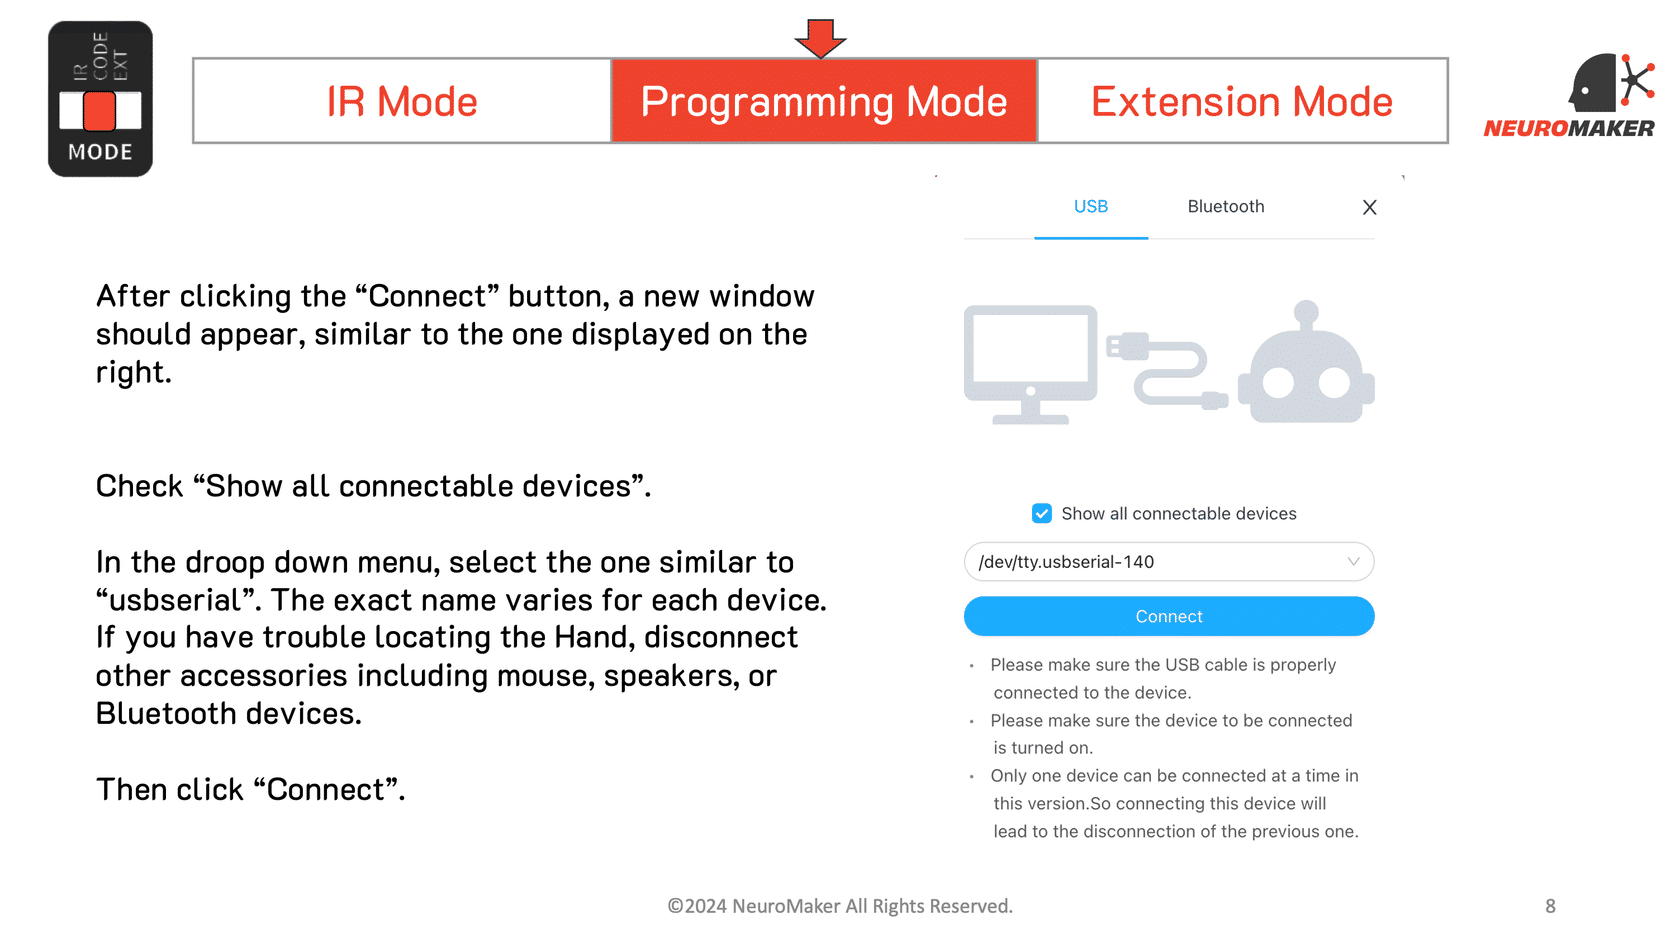
Show every connectable device

In the connection window, check Show all connectable devices. Open the port list before choosing a connection; the HAND may not be the first item shown.
Current mBlock connection dialog showing Show all connectable devices, a serial-port list, and Connect
Current Makeblock reference screen. Device tiles are illustrative; keep Arduino Uno selected.

Step 15

Choose the HAND’s COM port

Select the port that appears when the HAND is plugged in—often COM3 or COM4, but any COM number is possible—then click Connect. If you are unsure, unplug the HAND, note which port disappears, reconnect it, and choose the port that returns.

Step 16

Upload one gentle first program

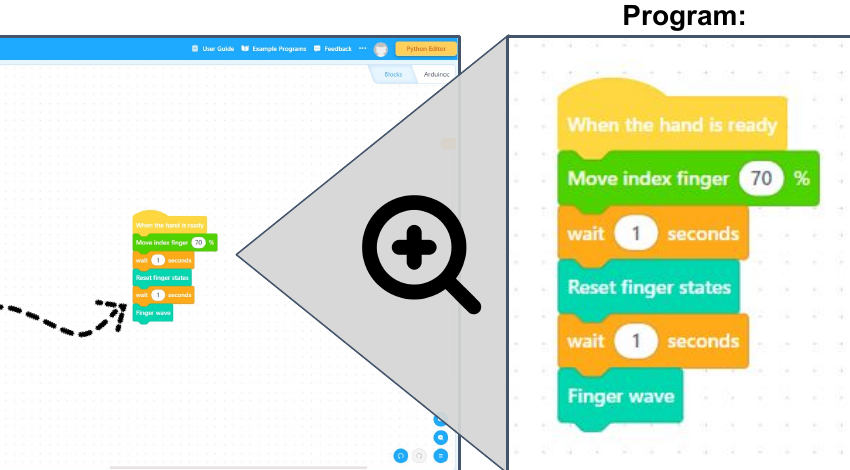
Keep When the hand is ready at the top. Add one finger-movement block at a modest value, add a wait 1 second block, reset the finger state, and wait another second. Keep hands and loose objects away from the mechanism, then click Upload and wait for the success message before disconnecting anything.
May 2022 NeuroMaker reference showing a HAND program beginning with When the hand is ready and the Upload button
Official NeuroMaker HAND mBlock setup reference, May 2022. The current interface may look different.

First upload complete

Your original NeuroMaker HAND is ready.

Keep mLink 2 open while programming. Build from one slow finger movement, leave time between motions, and stop immediately if a servo stalls, collides, or buzzes continuously.

First-generation quick fixes

If the original HAND does not connect

No COM or usbserial port appears

Confirm the data USB cable is connected to the UNO board, not BrainDEMO. Try another cable and USB port, then compare the list before and after reconnecting the HAND.

Only one power-board LED is lit

Both red and green LEDs should be on. Green only points to the 9V battery; red only points to the four AA batteries. Replace the affected set with fresh alkaline batteries.

The USB socket is blocked

Do not force it. That is the BrainDEMO factory controller. Turn the HAND off and install the separate microcontroller marked UNO for programming.

mBlock says mLink is not open

Open mLink 2, fully quit Chrome, reopen Chrome, reload ide.mblock.cc, and click Switch to mLink. Closing only the tab is not enough.

NeuroMaker Hand cannot be found

Add the standard Arduino Uno device first. Then use the lower extension +, search for case-sensitive NeuroMaker, and try v3ext if no result appears.

The program will not compile or upload

Use Upload mode and begin every program with When the hand is ready. Check that another app is not using the same serial port, then power-cycle and reconnect the HAND.

The upload succeeds but nothing moves

Confirm the HAND power switch is on, both LEDs are lit, and the servo plugs are seated in the correct S1–S5 positions. Add a one-second wait between movement blocks.

The wrong port keeps failing

Use Device Manager to find the CH340 COM port, or unplug the HAND and select the COM entry that disappears and returns.

On a school-managed device, ask IT to allow mLink 2, ide.mblock.cc, and USB serial access. Do not disable the computer’s antivirus or firewall.

Protect people and hardware

First-generation safety checklist

Use the specified batteries

Use one fresh 9V alkaline battery and four fresh AA alkaline batteries. Do not mix old and new cells or use rechargeable batteries. Turn the HAND off and remove batteries immediately if any become hot, swollen, or leak.

Keep the mechanism clear

Keep fingers, hair, sleeves, cords, and small objects away from the tendons, servo arms, and finger joints whenever power is on.

Stop on noise, heat, or collision

If a servo buzzes continuously, a finger stalls, parts collide, or the controller becomes unusually warm, turn the HAND off immediately. Do not force a finger; have an adult check wiring and calibration.

Start with a gentle program

Test one finger at a modest movement value with one-second waits. Confirm safe travel before adding more fingers, faster motion, or stronger grips.

Official references

Where these first-generation steps come from

NeuroMaker HAND mBlock setup guide ↗NeuroMaker HAND hardware and mBlock FAQ ↗Makeblock downloads ↗Makeblock mLink help ↗

Legacy screenshots are from NeuroMaker’s official May 2022 HAND mBlock setup reference and are cropped to the relevant controls. The current brain → Arduino Uno, HAND categories,Switch to mLink, and connection labels were checked in the live web editor in July 2026. The separate NeuroMaker Hand extension remains the official legacy fallback but may not appear in every current library view.